You do not need an accout to report a problem with the wiki.
-
TechInfoDepot:DD-WRT/OTRW2 (Optware the right way Take 2)
OTRW2 is the latest version of Optware for Broadcom routers. The original Optware project was lead by frater, but he has since ceased developing OTRW. The project was then picked up by basmaf who has continued development on Optware. To provide clarity between the difference in versions, basmaf's Optware is commonly referred to as OTRW2 or Optware The Right Way Take 2
Information on frater's original Optware can be found here: OTRW
This page describes the newer version OTRW2. Some information still applies to both versions, however it has been rewritten here for a more up to date view.
21-Aug-2014 basmaf is no longer developing or supporting OTRW2.
Official OTRW2 Forum Thread
Donation to basmaf possible
OTRW2 SVN/Trac
(This page is a work in progress, information is currently being added and is not complete)
Prerequisites
Optware runs on Broadcom routers only.
The following builds are supported:
- BrainSlayer builds up to 19519
- Fractal builds up to 20006
- All Kong builds based on Kernel 2.6
- Kernel 3.x (Very early development preview)
ARM builds are not supported
Brainslayer disabled FPU emulation in changeset 20047 which breaks Optware on DD-WRT. Kong compiles builds which are not affected by this change and hence all Kong K2.6 builds are supported.
Partitioning your external storage device
To use Optware you need to partition a storage device in a certain way. Your storage device can be a external hard drive, USB flash device or even an SD card. This guide provides a how to on partitioning your storage device:
Partitioning your storage device for Optware
- When creating your Optware partition it must be a minimum size of 512 MB rather than 256 MB. 256 MB is a requirement of OTRW, but this has changed in OTRW2
You should bear in mind that if you use a SD card or USB flash drive you should format your partitions with ext2. This is because ext2 does not use journaling. Using a journaling filesystem such as ext3 will potentially reduce the lifespan of your SD card or USB flashdrive.
If you are using a USB hard drive you can format your partitions with ext2, ext3 or ext4 (if your build has the ext4 modules included). A recommendation would be to use ext3 as journaling will benefit a USB hard drive and its more than likely that ext3 modules will be present.
Mounting your storage device to your router
You will need to mount your storage device to your router the steps will differ slightly depending on the chosen storage method
USB
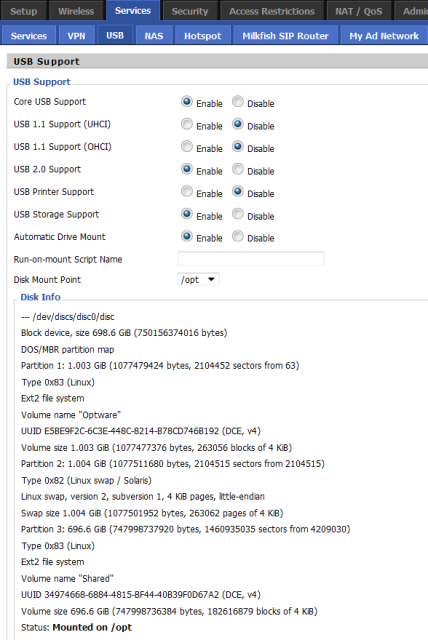
The easiest way to mount your external USB storage is to use the DD-WRT web interface GUI.
- 1. Go to Services > USB
- 2. Enable Core USB Support then USB Storage Support
- 3. Finally enable Automatic Drive Mount
- For builds older than 15501 you will be required to select the filesystem type. Newer builds do this automatically.
- In newer builds the Disk Mount Point field will not be present, generally automount can detect the correct mount settings for you. There is an option to override this behaviour should you need to.
Note about USB hubs:
If you are using a USB hub/connecting more than one USB device be careful not to cause too much drain on the power supply of your router. Self powered USB devices should be used cautiously (even USB flash drives). If you experience random rebooting check that you are not overloading your router power supply.
SD Card
These instructions are from Dark_Shadow, all credit goes to him.
You should have already partitioned your SD card as outlined in the How to partition your storage device for Optware guide above before doing this step.
It is strongly recommended to do a 30/30/30 reset before mounting your SD card.
Builds after 13309:
- 1. Enable SD support. The firmware will automount the first partition to /mmc.
- 2. Enable jffs.
- 3. Setup your internet connection.
- 4. Save the following script to Startup in Administration > Commands
mount /dev/mmc/disc0/part2 /opt
mount /dev/mmc/disc0/part3 /jffs
Builds before 13309:
- 1. Start fresh system 30/30/30. Clean formatted sd card ext2 or ext3, with /jffs directory then create /opt inside of jffs ex. /jffs/opt. For some reason the later builds have a problem with formatting a card on setup, it screws the partition making the card invisible to the router.
- 2. Boot router, enable and setup GPIO's in the GUI for the SD Mod, because in the later builds auto GPIO is broke. Also setup your internet connection. Enable jffs.
- 3. Copy the SDHC driver from here to the root directory of the mmc card via WinSCP then save this script below to Startup in Administration > Commands. This startup script will run the new SDHC driver all the time. It is only necessary until the release of a build with it all ready ported. (13309)
cp /mmc/sdhc-gpio2.o /tmp
umount /mmc
rmmod mmc
insmod /tmp/sdhc-gpio2.o
mount /dev/mmc/part1 /mmc/
mount --bind /mmc/jffs /jffs
mount -o bind /mmc/jffs/opt /opt
Installing OTRW2
In order to install OTRW2 you need to use the prep script. Note the supported builds at the top of this wiki entry before attempting to install.
Prep script for all supported builds
# Install script
wget -O /tmp/prep_optware http://dd-ware.googlecode.com/svn/otrw2/prep_optware
sh /tmp/prep_optware
Kernel 3.x
Optware is currently in development for Kernel 3.x builds, a lot of redevelopment work is required in order to get OTRW2 working under Kernel 3.x in the same way as Kernel 2.4 and Kernel 2.6 builds. Previously there was a different prep script for K3.x. Now however, you should use the above prep script if you weren't already using it, as it automatically detects the appropriate install path when executed.
Note that installing OTRW2 on a Kernel 3.x router, it is a very early development release. Some services are missing, and packages may not function correctly out of the box. If you like living on the bleeding edge, become a tester and try out OTRW2 on Kernel 3.x. Otherwise, for full OTRW2 functionality, use K2.4 or K2.6.
Executing the prep script
You will require telnet or SSH access to your router in order to run the above commands. Your router also needs to have a working internet connection. In telnet or SSH try pinging an external website to confirm this is the case:
ping www.google.co.uk
PING www.google.co.uk (74.125.132.94): 56 data bytes
64 bytes from 74.125.132.94: seq=0 ttl=47 time=28.850 ms
64 bytes from 74.125.132.94: seq=1 ttl=47 time=24.619 ms
64 bytes from 74.125.132.94: seq=2 ttl=47 time=24.336 ms
64 bytes from 74.125.132.94: seq=3 ttl=47 time=30.179 ms
After a couple of successful pings you can stop pinging (CTRL + C) and run the above commands. If you can't ping external websites, try rebooting your router. If that doesn't work you'll need to investigate internet connectivity issues.
Once you execute the prep script OTRW2 will now be installed, it will take a bit of time.
The process will take a varied amount of time depending on your connection and your router CPU clock. Close your Web Interface as this consumes precious memory and CPU resources.
Once everything has completed, wait you will be returned to a root prompt. Wait a minimum of 1 minute, then type reboot into either the BusyBox/Telnet Shell or reboot via Web Interface.
Important After rebooting, wait again at least another minute before logging back into the Telnet/SSH session!
After the reboot, OTRW2 should be running!
Services and Configuration
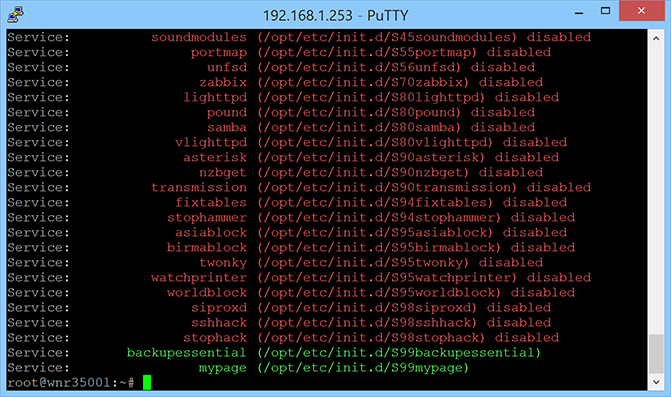
You should now have OTRW2 installed. Now to explore the various custom scripts and services. Once OTRW2 is installed you can run the service command without any paramaters to view all available scripts. (note: if a service doesn't seem to be working after you turn it on and start it, you may have to reboot the router to get it going.)
This will output all available services and if they are running or not, this is indicated by the red or green colour used
service
The service command allows you to control the starting and stopping of services with values of "start" or "stop" as well as being able to control if services will autostart on boot, with the values of "on" or "off"
service <servicename> <on/off/start/stop>
For example if you wanted the service mypage to autostart, you would run:
service mypage on
Available services under Kernel 2.4 and 2.6
- factconfig
- named
- xinetd
- dbus
- automount
- rotate_log
- pixelserv
- soundmodules
- portmap
- unfsd
- zabbix
- lighthttpd
- pound
- samba
- lighthttpd
- asterisk
- nzbget
- transmission
- fixtables
- stophammer
- asiablock
- birmablock
- twonky
- watchpriunter
- worldblock
- siproxd
- sshhack
- stophack
- backupessential
- mypage
Available services under Kernel 3.x
Currently, there are less services available to use under Kernel 3.x due to the noted points above.
- xinetd
- portmap
- unfsd
- fixtables
- stophammer
- asiablock
- birmablock
- watchprinter
- worldblock
- sshhack
- stophack
- backupessential
- mypage

