TechInfoDepot:Tomato/How to Create a Custom Theme For Your Router GUI with Tomato Firmware
MyOpenRouter member Johan was asking recently about custom skinning and themes for the Tomato firmware. However, I've discovered that it's not a new idea and people have been creating custom themes for years. In fact, most Tomato firmware builds include quite a variety of custom themes.
They also give you the ability to create your own theme. You can create one using your specified colors and custom images, and without having to compile any new firmware. All you have to do is create the theme and save it to your router. The only time you may have to replace it after saving is if you update to a different firmware, or erase the data from your router.
There are several ways you can create, test and save a special custom theme to your router-- before we get into the details, you should be familiar with several options and programs.
How to Install a Pre-Built Tomato Theme
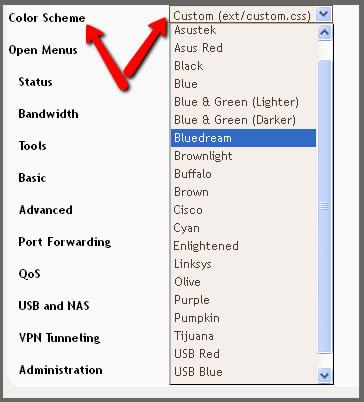
In the Tomato user interface, all themes on your router are selectable by going to your router's setup menu and selecting 'Administration > Admin Access'. On this page you will see a list of available pre-made skin themes. You can go through the list and try several themes. If you find one that suits you, then just click on 'save' and your selection will become your default theme.
If you can't find a theme that suits you, or you need a specific theme for your workplace or brand, then you will have to create a new custom theme. To do this, you must be able to access and work with files on your router.
Accessing Router Files
If you're not familiar with how to access the file system on your router, we have a separate guide on how to do this via SSH using either WinSCP (Windows) or Cyberduck (Mac.)
Where the Pre-installed Skin Files are Stored
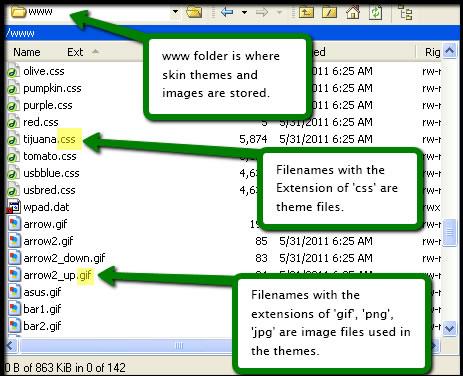
If you are wondering where the pre-installed themes and images for the skins are, you can find them in the 'www' folder on your router.
The Skin CSS files
The skin or theme uses CSS files to specify the layout, color scheme, included images and other details. CSS stands for Cascading Style Sheets. CSS defines how HTML elements are to be displayed. External style sheets enable you to change the appearance and layout of all the pages in a Web site, just by editing one single file. Using CSS this way allows you to make changes to the layout without having to edit or worry about changing the main files and possibly rendering the GUI unusable.
If you are unfamiliar with CSS files and how they work, I suggest you take a look at w3schools.com's basic tutorial here. You will need to know at least rudimentary details on how CSS files work in order to create your own theme.
The Custom Skin File Location
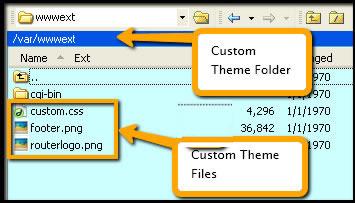
If you select 'Custom (ext/custom.css) as the color scheme at 'Administration > Admin Access' the Tomato firmware looks for the file custom.css in the /var/wwwext/ folder. If found, the Web GUI will use that theme file and you can save it as your custom theme.
This is the folder where you would create and copy your special CSS files to. One thing to note about any files copied to the /var/wwwext/ folder is when the router is rebooted the files are deleted. We get around this by saving them in another folder on your router and then writing a script that copies them to the /var/wwwext/ when your router reboots. We will show you how you can do this at the end of the article.
While you are creating and testing your changes, if you do something that makes the GUI unusable you can reboot your router and a default theme will come back-- this is a nice benefit of the files being deleted upon reboot.
Knowing this, we recommend you create and test your changes before saving them on your router permanently.
How to Install Custom Theme Files to Your Router
The easiest way to get started and install a custom theme is to download and install a test theme file. Once you have done this, you can then make changes to it for your personal needs.
You can download a special MyOpenRouter.com theme to install here. This theme includes a header logo and footer logo. This is a great theme to install as a sample of what you can create.
It is a Zip file containing a custom.css file, a footer.png image and a header file named routerlogo.png.
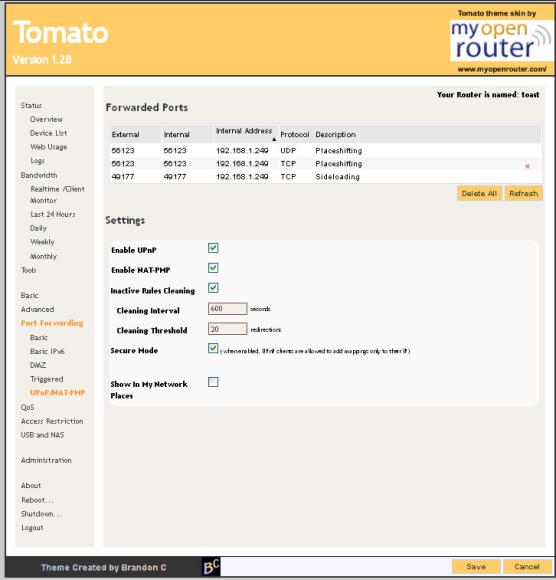
After you have downloaded and unzipped the custom theme, you would then copy all three of the files to your router's /var/wwwext/ folder. Once copied, then go into the 'Administration > Admin Access' page in your browser and select the custom theme. Once selected, you should immediately see your new theme. It should look like this.
If for some reason you don't see this new theme then recheck that all three files have been copied to the correct folder on your router. You may also have to do a complete page reset in your browser. Simply enter a Ctrl-F5 which forces a cache refresh in your browser to get the new files to show.
Keep in mind that if you select the new custom theme and don't save it when you change menus you will revert back to your original theme. If you want to see how it looks on other menu pages then you need to save it first.
If you don't want to keep it then you can change back to another theme and the next time you reboot your router the custom theme files will be removed from your router.
If all went well, you should be seeing your new custom-made theme. Now you can edit it to make the needed changes to make the theme your own.
Editing the Custom.css Theme File
As we mentioned before, if you have never worked with CSS files you should take a look at some CSS beginner tutorials and see how basic coding of a CSS file works.
If you have worked with CSS files you will recognize some of the properties in the Custom.css file that the firmware uses.
For example: the Body, Container and hover.
Setting up the Header
There are other properties that can be changed. For example, the Header. In our example MyOpenRouter.com theme we set up the header like this.
#header {
    background-color: orange;
    background-image: url("routerlogo.png");
    background-position: right center;
    background-repeat: no-repeat;
    border-bottom: 3px solid black;
}
The above sets up so our header has;
- A bottom border that is 3 pixel thick and in solid black
- A background image named routerlogo.png. This image is saved and available in the same /var/wwwext/ folder as where the CSS file is located.
- The background image is not repeated and shown on the right side of the header.
- The rest of the header has the background colored orange
We also have set up the header title and the firmware version placement, size and color.
The title setup is called #header .title and how we show the firmware version is set up in the #header .version property.
As an example our header title has a white font and is set at a bold 50px in size.
#header .title {
    color: white;
    font: bold 50px 'Trebuchet MS',Sans-serif;
    letter-spacing: -2px;
    margin: 0;
    padding: 0;
}
Showing the Router's Name
There is also an identity property. This shows the identity of what you have named your router.
The property is simply called 'ident'. This is how we setup where and how we show the router's identity. We setup the font size, type and color. We aligned it to the right side and then we added some text to be shown before it. We did this using '#ident:before'
#ident {
    color: black;
    font: bold 12px 'Trebuchet MS',Sans-serif;
    padding-right: 5px;
    text-align: right;
}
#ident:before {
    content: "Your Router is named: ";
}
Our router is named 'My 3500L' and it looks like this in our setup.
Our footer or bottom of the page is setup using this:
#footer {
    background: url("footer.png") no-repeat scroll left 50% white;
    border-top: 2px solid black;
    height: 1px;
    padding: 4px;
    text-align: right;
}
Again we have a footer image (footer.png) and have set its position fixed to the left side. We set the background color and border between the footer and the main content.
The Navigation Menu are all the menu options on the left side of the webpage. The layout is determined by the 'Navi {' properties. You can set the basic font size and color, the highlighted size and color and what happens when you hover your mouse over a menu choice.
The Container Area
The 'container' area is the main area of the page. You can set the background color, the size of the container area, and its border. The original size is set in the tomato.css file at 900 pixels. You can change that if you wish by adding the width: property and setting a size. I would not recommend you go any smaller than 900px, but you can go larger depending on your monitor size and setup.
Saving your Theme Files
As we mentioned at the top of this article, placing your new theme files in the /var/wwwext/ folder will allow you to use the theme files and change them as needed but if you reboot your router these files will be deleted.
The way around this is to save your theme files to a folder that does not get deleted on reboot and then writing a script to copy the files to your /var/wwwext/ folder every time you reboot.
There are several places and ways you can do this. Some folks turn on and save the files to their /cifs1 or /cifs2 folder. You could save them to an external thumb drive or hard drive or you could save them to a JFFS folder.
In our example, we turned on JFFS and saved our theme files to it.
Once saved to a permanent folder we have to write a script that runs at boot up to copy the files over to the /var/wwwext/ folder.
Using our example theme we wrote this script to copy our files and put it under our 'Init' tab.
cp /jffs/custom.css /var/wwwext/custom.css
cp /jffs/routerlogo.png /var/wwwext/routerlogo.png
cp /jffs/footer.png /var/wwwext/footer.png
Now, every time the router reboots or if there is a power outage, the files are recopied over to the correct folder.
Depending on where you save your files you may have to delay the copy process so the router loads other needed programs first.
To do this you would use the 'sleep' command.
For example;
sleep 10
cp /jffs/custom.css /var/wwwext/custom.css
cp /jffs/routerlogo.png /var/wwwext/routerlogo.png
cp /jffs/footer.png /var/wwwext/footer.png
The '10' being the number of seconds. If you have an issue where you need to use the sleep command you may have to play with it a bit to get the correct amount of time for your setup.
Wrap Up
The basic steps here were:
- Turn on SSH
- Download sample Theme file and unzip files to your computer.
- Copy all new theme files to the /var/wwwext/ folder on your router using WinSCP (or similar program)
- Test theme (You may have to do a Ctrl-5 to flush your browser cache).
- Edit theme as needed.
- Save edited theme to /var/wwwext/ folder
- Turn on JFFS
- Save all new theme files to /jffs folder.
- Write script to copy files over to /var/wwwext/ folder when router reboots.
- Enjoy!
Additional Notes
- If you use Firefox, the Firebug program is super handy for this kind of stuff. Basically, you select the part on the page you want to see the CSS elements for, (the Custom.CSS file) then you can play with them, change colors etc, right there without committing them live. When happy you can copy the CSS file and save it as your new theme. You can also test image changes to the background this way too.
- We have added an extra sample theme in our download area called ThemeFlame. It is an example of using a larger header logo and a background image instead of a color.
If you create your own theme we would love to see it! You can post a screen shot here or submit it for download in our downloads area.


